Getting Started: Hosting the MML Starter Project
There are several ways to deploy the MML starter project.
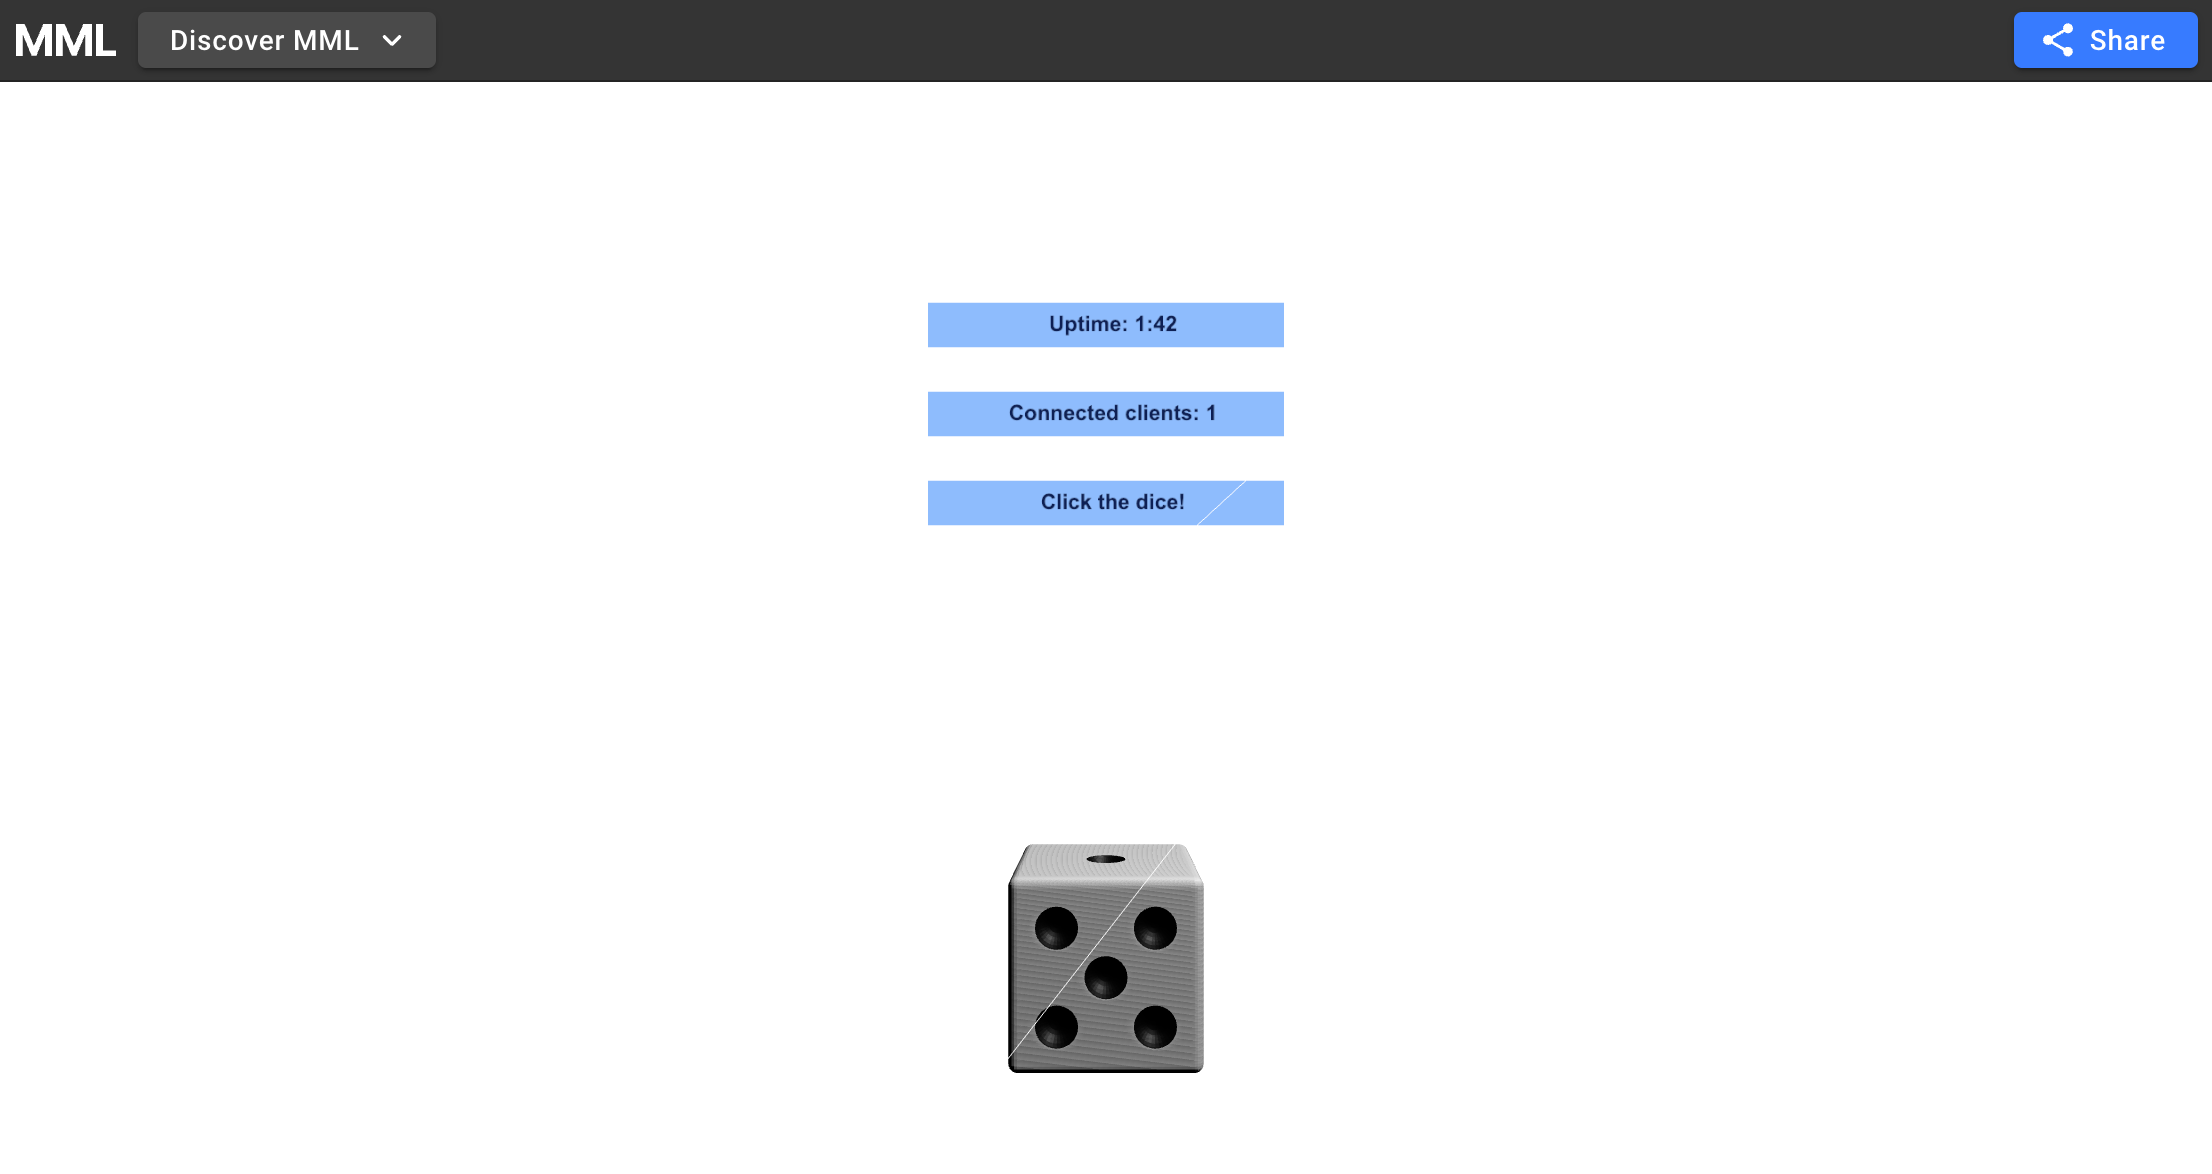
The project provides a single MML Document running on a NodeJS server. Whichever method you pick to deploy it you should see an interactive dice model that rolls whenever one of the connected users clicks on it.
This is a non-exhaustive list of a few methods that MML contributors have verified to work, with some things to consider and look out for with each solution.
This is intended to demonstrate how MML can be served using these methods and from this starting point you can fork the project to create your own hosted MML content.
CodeSandbox
CodeSandbox allows you to easily fork an existing sandbox of the MML Starter Project and start building with MML.
How-to
- Make sure you’re signed in on https://codesandbox.io before continuing.
- Click the following button:

- Click the “Fork” button in the very top right of the page and then wait for your forked Sandbox to start up. It might take a few seconds. You will know the project is running when you see “Listening on port 8080” in the terminal on the right.
- Select the
start: 8080tab above the terminal pane to switch the view to the running document. - You can now interact with the live MML document.
- Open the
src/mml-document.htmlfile from the file explorer on the left to open the document’s source. You can now make changes to the HTML and see them reflected live in the preview window to the right. - The “Share” button in the top right of the preview pane allows you to find and copy the address of the running document.
Summary
- Very fast setup
- Sign in with GitHub/Google
- Easy to share live document and source code
- Free to get started
- CodeSandbox’s free usage has limited performance and may not be ideal for complex documents
Glitch
Similarly to CodeSandbox, Glitch allows you to “remix” the MML Starter Project straight from the GitHub repository.
How-to
- Click the following button:

- It may take a few minutes for the project to fully load and install the dependencies, but click on the “Logs” tab at the bottom of the page when it becomes available and wait for the output “Listening on port 3000” to know that it’s ready.
- Click the “Preview” tab and then “Open preview pane” and a pane should show on the right that shows you the live MML document that you can interact with.
- Open the
src/mml-document.htmlfile from the file explorer on the left to open the document’s source. You can now make changes to the HTML and see them reflected live in the preview window to the right. - The “Share” button in the top right of the preview pane allows you to find and copy the address of the running document.
Summary
- Very fast setup
- Sign in with GitHub
- Easy to share live document and source code
- Free to get started
- Glitch’s free usage has limited performance and may not be ideal for complex documents
Digital Ocean
How-to
- Create a Digital Ocean account if you don't have one and log in.
- Click the following link to deploy directly from the MML Starter Project repository.
- On the create app page, you should be able to keep the default options and click “Next” until the Review page.
- Click on “Create Resources”
- Click on “Go to Build Logs” to follow the progress as the app deploys and wait for the output “build complete”.
- Click on “Deploy logs” and wait for the output “Listening on port 8080” to know that it’s ready.
- Click on the “Live App” button near the top of the page or any of the links that show your app’s address in the format
https://xxxxx.ondigitalocean.app. - In the new tab that opens you should see the live MML document that you can interact with.
- Although doing the above deploys the starter project, if you plan to modify the MML document it is recommended to fork the starter project on github and deploy it as a new app to enable automatic re-deployments of your content.
Summary
- Relatively fast setup direct from the GitHub repository
- Provides more compute resources than free options and should be more stable
- Automatic re-deployments from GitHub (if you fork the starter project)
- No free tier (although at the time of writing there is the offer of free credit for a limited period)
- You can't share the code with others
- You can’t easily modify the MML document live
Heroku
How-to
- Fork the MML starter project.
- Make sure you’re signed in on Heroku before continuing.
- Click on the “New” button and select the "Create new app" option.
- Give your app a name, select a region of your choice and click “Create app”. You will be presented with the “Deploy” page of your new Heroku app.
- Next to the “Deployment method” section, click “GitHub” and then “Connect to GitHub”. Click on “Authorize heroku” to connect your account.
- After connecting your GitHub account, search for the mml-starter-project repository fork.
- Click “Connect” next to the forked repository.
- You could set up automatic deploys, but for now, click on the “Deploy Branch” in the “Manual deploy” section.
- Wait until you see the “Your app was successfully deployed.” message.
- Click on the “View” button.
- In the new tab that opens you should see the live MML document that you can interact with.
- The “Share” button in the top right of the preview pane allows you to find and copy the address of the running document.
Summary
- Relatively fast setup
- Provides more compute resources than free options and should be more stable
- Automatic re-deployments from GitHub can be configured
- You need to fork the repository before deploying
- No free tier
- You can't share the code with others
- You can’t easily modify the MML document live
Railway
How-to
- Fork the MML starter project.
- Make sure you’re signed in on Railway using your GitHub account.
- Click on the New Project button and select the "Deploy from GitHub repo" option.
- If you have never used Railway before, you need to select the “Configure GitHub App” option and select your account. You can choose to allow all the repositories or only the fork you want to deploy. Select the
Deploy from GitHub repooption when you return having authorized the GitHub app. - Search for and select the mml-starter-project repository fork. You may need to refresh the page if you don’t see the repositories immediately available.
- Click “Deploy Now”
- Wait until you see “Success” on the deployment row.
- Click the “Settings” tab and find the “Environment > Domains” section.
- Click “Generate Domain” and your app will be available on the link that is displayed. It will be in the format
https://xxxxxx.up.railway.app. - Click the link and in the new tab that opens you should see the live MML document that you can interact with.
- The “Share” button in the top right of the preview pane allows you to find and copy the address of the running document.
Summary
- Fast setup
- Provides more compute resources than the sandbox options and should be more stable
- Free basic plan
- Automatic re-deployments from GitHub
- You can't share the code with others
- You can’t easily modify the MML document live
AWS Lightsail
- Disclaimer: Deploying the MML starter project in AWS Lightsail or any other self-managed VPS service has a lot of complexity involved, so please keep in mind this is not one of the Fast setup options, but a more permanent solution for those who may see usage for such permanency and full control of the deployment environment.
How-to
-
If you don't have an AWS account, create one at: https://aws.amazon.com
-
Create a new Lightsail instance at https://lightsail.aws.amazon.com. by clicking the
Create instancebutton. Then you can select your instance plan (at the moment this guide was written, any plans to the $10 plan will allow you to use them for free for the first 3 months, and their specs are good enough to host the project). We recommendUbuntu Server 22.04 LTSas the choice for the operating system, as will certainly offer everything you'll need, and due to its popularity, you'll have an easier time finding answers on how to manage it or installing further things you may want to use it for. -
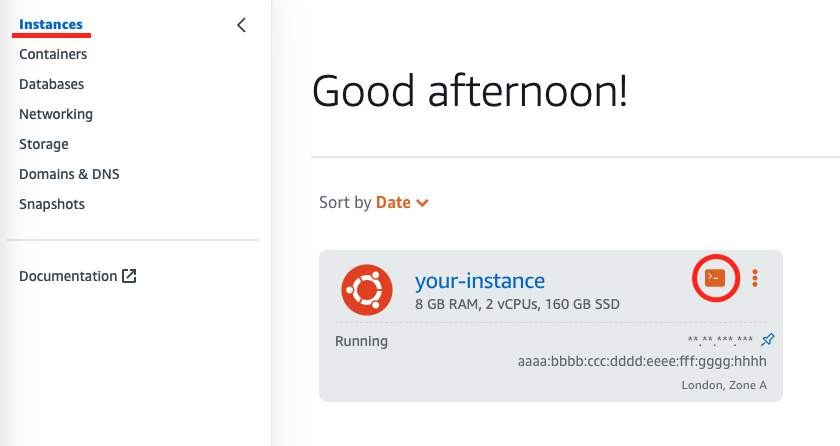
Once you have your Instance created and running (it usually takes a few minutes after its creation), you can jump straight into accessing it through SSH using the little terminal icon on your Instance label. That will grant you access through SSH on a web browser. (screenshot below)
-
In case you want to access it through SSH on a Terminal or other SSH applications like PuTTY, you can follow the steps explained here: Understanding SSH in Amazon Lightsail to manage the SSH keys required to access your VPS.
-
Update your Linux distribution through the following command:
- Install NVM, which is the easier and most flexible tool to install and manage NodeJS versions, through the following command:
- Install NodeJS 16 by running:
- While logged in through SSH on your instance, clone the MML starter project by running:
- Install the project dependencies:
- Run the project in development mode to check if everything runs fine:
-
There are a few extra steps so you can access your Starter Project. The first one is getting a static IP address for your LightSail Instance, which you can do by clicking a
Create static IPbutton at the Networking tab. -
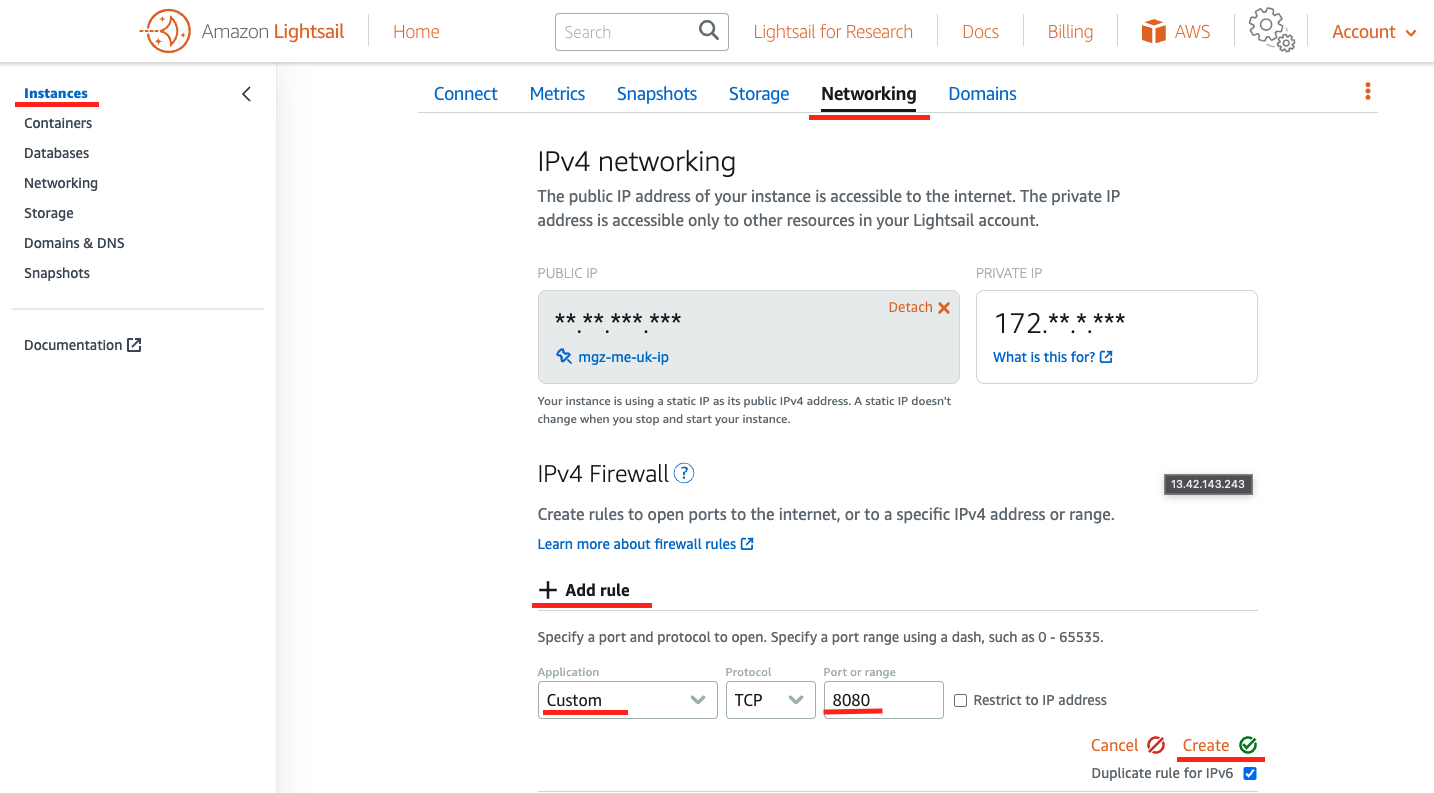
The second one is to allow the connections to port
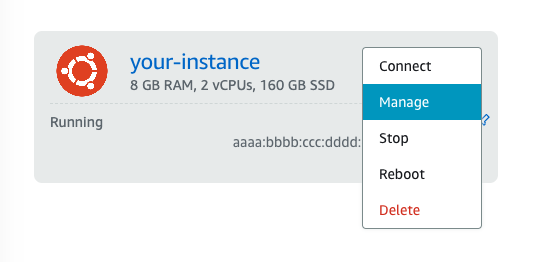
8080(which is the port the Starter Project uses to receive incoming connections). To do so, you can do to your Instances tab, click on the three dots of your instance, click on Manage, go to the Networking tab, and add a new Custom Firewall rule to allow TCP connections to port8080(please see the screenshots below).
-
With your static IP set, your firewall rules updated, and your Starter Project running, you can test it by going to:
http://<your_static_ip>:8080 -
You may now assign a Root Domain to your instance by clicking in
Networkingon the left panel, going toDomainsand clicking onAssign domainto point a domain name to the static IP you created. To know more details about pointing your domain to a Lightsail Instance, you can check the official How to guide about it on AWS. -
Install Nginx to act as a proxy to pass the connections for your IP address on the default port to 8080, through the following command:
- Prepare Nginx to proxy your default income connection at port
80to port8080(the port the MML starter project listens to), by creating a configuration file at/etc/nginx/sites-available/<YOUR_ROOT_DOMAIN>with your favorite text editor. The content the configuration file should look like this:
- After creating the config file, you have to create a symlink pointing to it at
/etc/nginx/sites-enabled/. To create the symlink, run the following command:
- After creating and symlinking the file, you may test if your config is properly written by running the command:
-
Please keep in mind that before getting an SSL certificate for your app in your Lightsail instance, you'll need to point your registered domain DNS resolution to the AWS Lightsail name-servers to access the app through your registered domain. To learn more about DNS Zones, please check out the official Lightsail documentation about it.
-
Once everything is ok, you may obtain an SSL certificate using Certbot (free and open-source solution). You can install Certbot and its dependencies by running the following command:
- After Certbot was installed, you may generate your certificate by running:
At this point, you may access your app through: https://<YOUR_ROOT_DOMAIN>/
Summary
- Provides more compute resources than the sandbox options and should be more stable
- More flexible and robust infrastructure that will allow you to securely host multiple applications with subdomains and SSL certificates
- You have full management control over your VPS
- More complexity and efforts to setup
- Requires more knowledge and experience in SysAdmin, managing servers, and Linux distributions